How To Fix Windows 11 Sound Not Working
In my previous tutorial "How To Fix Windows 10 Sound Not Working" detailed instructions on how to effectively solve it for Windows 10. Basically, the way to solve Windows 11 Sound Not Working errors is similar, with some small changes below so you should take note
Windows 11 Sound Not Working makes users unable to listen to music, watch YouTube videos without sound, or play games without sound, Normally, the sound loss error on Win 11 occurs due to a software conflict, or no sound driver installed. To fix the sound loss error on Win 11 most effectively, readers can refer to the instructions shared in the article below and follow the ways.
Audio problems on Windows 11 can be caused by hardware and software failures, specifically, it can be due to misconfiguration, improper installation, or it can also be due to the audio file format.

How To Fix Windows 11 Sound Not Working
Method 1: Restart The Computer
Restarting the computer is considered the simplest solution "of all time", helping to fix most errors, and problems, including sound loss on Windows 11.
Restarting the computer will wipe out the cache, which can cause errors, and compatibility issues with software, and audio drivers and cause errors. Finally, try to check if the sound loss error in Windows 11 remains. If so, refer to some of the next fixes below.
Method 2: Check The Audio Output
The cause of the other Windows 11 audio loss error may be that the user selected the wrong audio output device, in case if there are multiple output devices connected.
To test the selected audio output device, first press Windows + A to open the Action Center.
Here you find and click on the arrow-shaped icon next to the volume level icon as shown in the image below:

The above operation opens the list of audio devices connected to the system. Here select any device where you want to play the audio and check if the sound loss error in Windows 11 remains.

If the error no longer occurs, you can set the device as the default option for Windows 11 to play a sound. To do this, type Change system sound into the Search box on the Start Menu and click to open it in the list of search results.

On the Sound window, find and click the Playback tab select the output device you want to set as default, and click the Set Default button in the bottom corner. Finally, click OK to save your changes and close the window.

Way 3: Check Windows 11 Audio Settings
To check Windows 11 audio settings and fix sound loss, follow the steps below:
Step 1: Right-click on the sound icon in the system tray located in the bottom right corner.
Step 2: Select Sound Settings.
Step 3: Here you check the audio volume level.

Step 4: Check if the speakers/headphones are turned on.
Step 5: Check if the speakers/headphones are properly connected to the computer
Step 6: Set the device audio to Default.
Step 7: Check again to make sure the software you're using is configured for your device's audio forwarder.
Step 8: Restart your computer to apply the change. At this point, the sound error in Windows 11 will no longer be available.
Method 4: Update to the Latest Audio Driver Version
Outdated audio drivers are also one of the main causes of sound loss errors in Windows 11. Try updating to the latest version of the audio driver to see if that helps fix the error. However, your computer now needs a network connection. If you have a Wi-Fi loss error on Windows 11, you can refer to how to fix it here and proceed to Update Driver and reinstall the audio driver on Windows 11.
- Read More: Fix Windows 11 Wifi Not Showing Up
Follow the steps below:
Step 1: Right-click the Start button and select Device Manager.
Step 2: Here find and expand the Sound, Video, and Game Controllers section.
Step 3: Find and right-click on your audio device that is failing.
Step 4: Click Update Driver to update to the latest audio driver version.

The system will automatically search and install the latest audio driver versions. Follow the same steps to update other audio drivers (if any) and check if the sound loss error in Windows 11 remains.
Besides, if you cannot hear sound during the conversation, you also need to check your friend's microphone to see if it is working to make sure this is not a microphone error.
Method 5: Restart The Audio Service
If none of the above works, the next fix is to try restarting the Audio service.
Step 1: Enter services in the Search box on the Start Menu. On the list of results, click to open the window.
Step 2: On the find window and right-click on Windows Audio, select Restart to restart the service.

The above operation is to restart all Audio services on the system. Once done, perform the same steps and restart the Windows Audio Endpoint Builder and Remote Procedure Call services.
Method 6: Disable Audio Enhancements
According to some users shared on technology forums, Audio Enhancements is the cause of the audio loss error in Windows 11. The solution to fix the error in this case is to turn off Audio Enhancements.
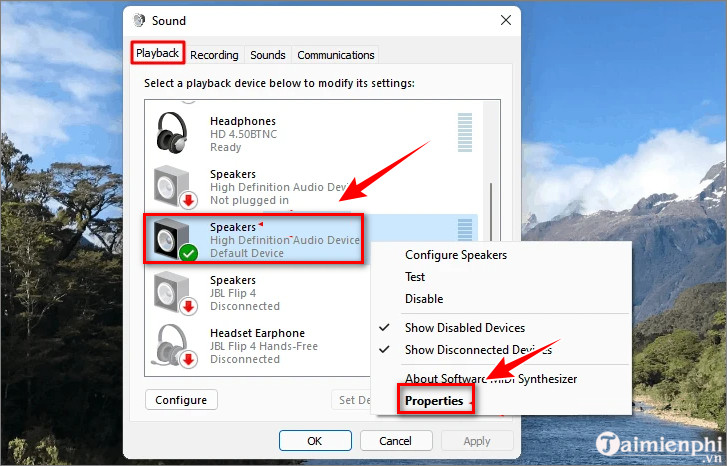
First, type Change system sounds into the Search pane on the Start Menu. On the list of results, click to open the window.
On the Sound window, find and click on the Playback tab and select the device or speaker that is failing, Select Properties in the bottom corner.

Next on the Properties window, find and click on the Enhancements tab. Here you find and tick, select the Disable all enhancements option, then click OK to save your changes and close the window.
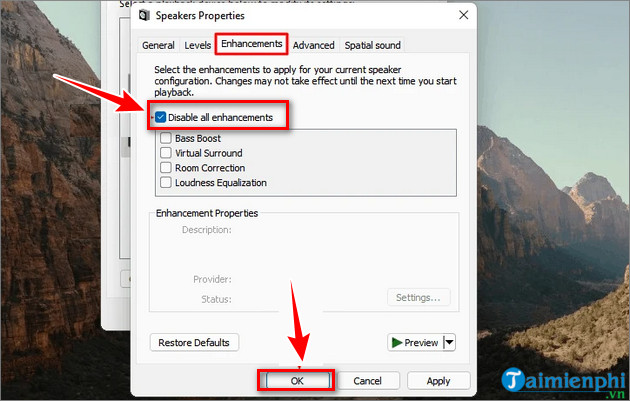
Finally, try to check if the sound loss error in Windows 11 remains.
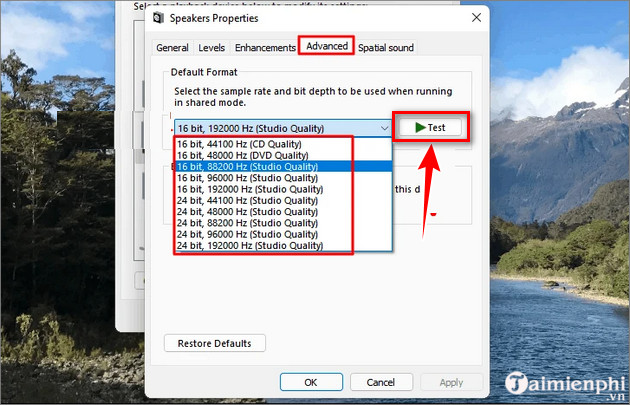
Method 7: Change Other Audio File Formats
An audio format that is incompatible with hardware settings can also be the cause of the sound loss error in Windows 11. In this case, the solution is to change the compatible audio file format.
To change the audio file format, open the Sound window as shown above, then access the Playback tab. Next, find and right-click on the audio output device you're having trouble playing audio and select Properties.
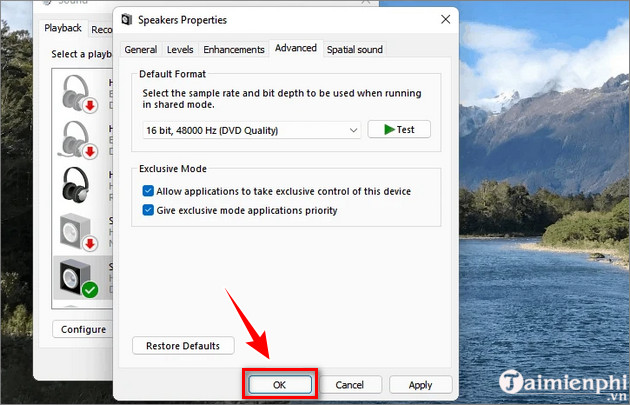
In the Speakers Properties window, find and click the Advanced tab, then click on the audio file format from the menu and click Test. This is to find an audio file format that is compatible and works well.
Finally, click OK to save your changes.
Hopefully, the ways to fix sound loss in Windows 11 that 5startpc introduced above will help you fix the error. In addition, if you are facing the microphone not working error on Windows 11 after upgrading to the latest version of Windows, readers can refer to some articles already on 5startpc to learn how to fix the error.https://thuthuat.taimienphi.vn/cach-sua-loi-mat-am-thanh-trong-windows-11-65231n.aspx
Hopefully, the ways to fix sound loss in Windows 11 that 5startpc introduces above will help you fix the error. In addition, if you still can't fix it, you can reset Windows 11 to its factory state, then try again to see if there is sound.
Read More: 3 Simple Ways To Take Screenshots Windows 10
Tag: windows 11 sound not working, windows 11 no sound, windows 11 audio not working, no sound windows 11, windows 11 sound problem, sound not working windows 11, audio not working windows 11, no sound on computer windows 11, laptop sound not working windows 11, windows 11 sound issues, laptop speakers not working windows 11, windows 11 no sound after update, windows 11 no audio, hp laptop sound not working windows 11, no sound on laptop windows 11


0 comments: